TWO PART TOP INSTALLATION SUMMARY
This is a summary only. The full manual has detailed illustrations and
photographs. It is a comprehensive 50 page guide and tutorial leading
the do-it-yourselfer fully through the removal of the old convertible top
and installation of the new one.
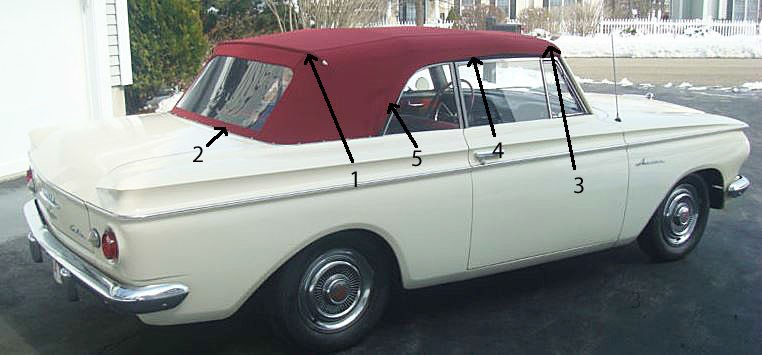
The cars we use to illustrate the process are '65 Rambler pictured above
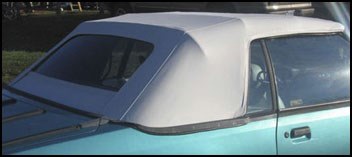
and a '93 Mustang shown below.
Just about every convertible, from 1941 to 2004, and even later, has a two
part top!
A small difference among the earlier and later two part tops is that earlier
'verts have a roof molding (#1 above in the Rambler.) You'll see why there
is none in the '93 Mustang.
The installation process is remarkably constant in all two part tops.
The top looks like one unit ! But once the molding (#1) is removed and the staples
underneath it are pulled the restorer sees that there are two sections joined together
above the rear window. The sections are also joined along the base line tacking forms
which we'll talk about later.
The main top is most of the top. The "curtain" is the rear window section. Its top edge
is stapled to the rear top bow (the bow over the rear window.) The upper back edge of the
top is stapled there too, right over the curtain's staples. The curtain was applied first. So its upper
edge staples (on the rear top bow) are underneath the staples that bind the back (upper) edge
of the main top. In other words: on the rear top bow there are two rows of staples: the upper row holds the back edge of the main top,
and the lower row holds the top edge of the curtain.
Embedded into the rear top bow is a long tacking strip. It is attached to a groove in the bow
with rivets. The tacking strip holds all those staples.
But what about the '93 Mustang below ? Where is the molding over the rear window ?
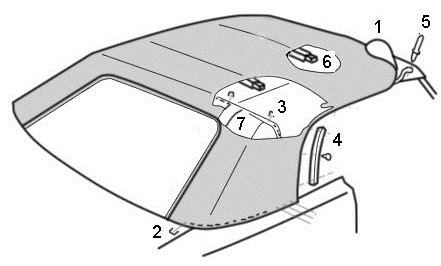
An old top's removal begins at the header bow (#3 in the Rambler above and #1 in the
illustration.) Then when the top is rolled back you see the staples along the rear top
bow. But in the Mustang (pictured below) the staples
are only seen underneath the top when it's peeled back. That's because the staples
are in a flap (called a listing) that is part of the top. The flap is factory welded to the
top. It is this flap that is stapled to the rear top bow in the Mustang. Same process,
only the outside molding is eliminated. Both methods are fully covered in the manual.
The removal process begins by orienting the top to best access the header bow. A front
seal or welting strip is pulled off (covered in detail in the full manual.) Staples are pried
off of the underneath of the bow and the fabric peeled off of the header bow.
Sometimes the peeling of fabric is a little tedious as old glue may have gotten stubborn.
Hair blower heat makes quick work of this. This is one of many details in the explanatory
text of the full manual.
Now the front end of a hold down cable is exposed. This will be seen screwed or riveted (near #3 in
the Rambler picture, and shown as #5 in the illustration below.) It's always near the front header bow corner.
Incidentally, #4 in the Rambler photograph points to the side hem of the top. Inside that hem,
in most convertibles, is the cable wire. The front of this cable as described above has just been
detached. The back of the cable is screwed or riveted to the folding frame further back above the
side window. In the full manual we show how new cables are installed. New cables should always be
installed in a new top.
Intermediate Bows: In the illustration below there are two bows between the header and the rear
top bow. The top has flaps on its under side. These are bound to the intermediate bows with contact
cement or via plastic retainers screwed to the intermediate bows. Once the top is removed from the
intermediate bows it is folded back exposing the staples over the rear top bow.
At the rear side window (#4 in the illustration below) there's a seal which is removed allowing the top
fabric under it to be peeled off.
This brings us to the rear trim stick which is #2 in the Rambler picture and in the illustration below.
The removal of the old top ends at the "trim stick." The trim stick is one or more tacking forms bolted to the body of the car. The back of the top and of the
curtain are stapled to the trim stick.
Here's a summary of the work at the trim stick:
Along the base line of the car there is one to three steel forms bolted to the car.
Embedded in these forms are tacking strips that receive staples. Collectively the base
line tacking unit or units is referred to as the "trim stick." We cover how the staples are
removed, how the trim sticks are marked to align the new top, and how the old top is
used to help orient the new top to the trim stick. The coverage is done with many
illustrations and photos so everything is clear.
The installation of a new top is the reverse of the removal process. This is described
with photos and illustrations in the full manual. The installation of the new top begins
at the trim stick and ends at the header bow.
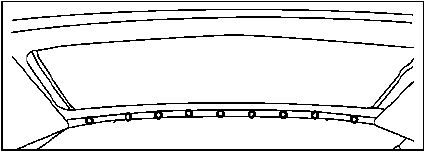
View of bolts holding trim sticks
to car. From inside car under
back window.